WinRest™ Online User Manual
Find Answers to all your questions about service options, pricing and other processes. Or visit the ABS YouTube channel for all the latest updates, videos and much more. And you can always chat live with an ABS Expert Advisor or call 905-278-7975 or 209-233-8846 today.
Top Solutions
| Add, Remove, Edit Menu Groups | Menu Sizes |
| Add, Remove, Edit Menu Items | Menu Modifier Utilities |
| Add, Remove, Edit Menu Modifiers | Remote Printing |
Browse by Category
Add, Remove, Edit
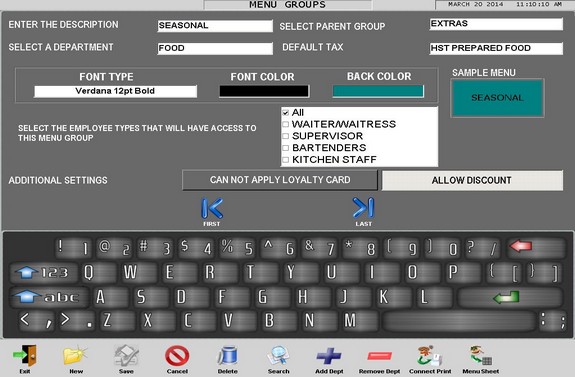
Menu Groups
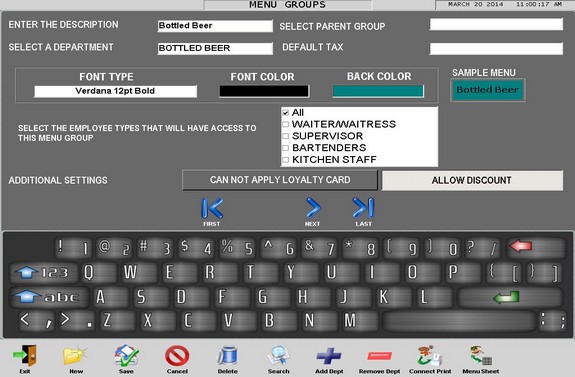
The Menu groups utility is critical for setting
up and organizing your menu. An example of a
menu group is Appetizers, Entrees, Beer, Liquor
or Wine. The menu groups tool allows you to
program menu groups into WinRest™.
1. Access the Menu Group Utility from the Options Screen.
2. Press "new" from the bottom row of buttons.
3. Give the new menu group its description and options.
4. Select an appropriate department, such as Alcohol, Food, Beverage, etc.
5. Press "save" along the bottom row of buttons.
6. Add menu items by pressing "menu sheet" along the bottom row of buttons.
7. Add the menu items to the menu sheet.
8. Save your changes and restart the application.
To Remove a Menu Group
1. Access the Menu Group Utility from the Options Screen.
2. Press "search" from the bottom row of buttons.
3. Select the group to be removed.
4. Press "delete" along the bottom row of buttons.
5. Save your changes and restart the application.
Return to Top
Add, Remove, Edit
Menu Items
The Menu items utility is a very important
aspect of WinRest™
that Is critical for setting up and
organizing your menu.
An example
of a menu item is: soup of the day, steak on a
bun, Budweiser, rum and
coke or
red house wine. The menu items tool
allows you to program and customize each
menu item so its easy
for WinRest™ users to find what
they are looking for in shortest amount
of time.
To Add a Menu Items
1.
Access the Menu Item Utility from the Options
Screen.
2. Press "new" from the bottom row of
buttons.
3. Give the new menu item its
description and options.
4. Press "save"
along the bottom row of buttons.
5. Save your changes
and restart the application.
To Remove a Menu Items
1. Access the Menu Group Utility from the
Options Screen.
2. Press "search" from the
bottom row of buttons.
3. Select the group to
be removed.
4. Press "delete" along the
bottom row of buttons.
5. Save your changes
and restart the application.
Return to Top
Using
Item Countdown to Keep Track of Menu Items
Using the Menu Item
Countdown
1. From the Menu Item
Details Utility, enable Menu Item Countdown.
2. In the Quantity box, enter in the ammount
available. Example. 100.
3. Save any changes
and restart the application from the Options
Screen.
4. Sign in and access the Sales
Screen.
5. Notice the Menu Item will now show
the quantity available.
Try using the Menu Item Countdown Utility in
conjunction with the WinRest™
Stock Utility to visual track stock levels.
Both utilities will have to be configured
independently as they are separate utilities and
do not influence eachother.
**IMPORTANT** Please note, the Menu Item
Countdown will not work for items with sizes.
Assigning a Menu Item #
Assigning a Menu Item
number will be useful when
items are to be printed on a separate kitchen
printout/chit. If an item number is desired
on the kitchen printout, then update the Kitchen
Order document by adding the correct database
field and adding a label in the
Receipt Design Utility.
1. From the Menu Item Detail Utility, enable
Assign Menu Item #.
2. Save any changes and
find the next menu item that will have an
assigned number.
3. Repeat this process until
all desired menu items have been updated.
There are a lot of settings
to explore in the Menu Item Details Utility.
Some are straight forward, like the Hide and
Disable options. Some will require further
customization like the Feature option. Feel free
to find what ones apply to you. If you require
further assistance, please contact your
Authorized WinRest™ Expert Advisor.
Return to Top
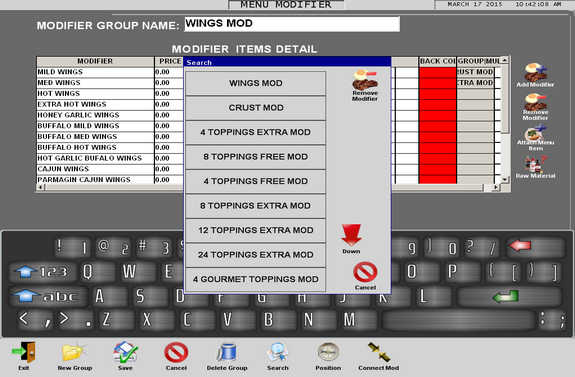
Add, Remove, Edit
Menu Modifiers
Every menu item can have
linked modifiers for cooking
instructions, premium toppings, unique requests and
more. Access the
Menu
Modifiers utility found in the Options
Screen to create and connect
menu modifiers to items to streamline the order
taking process.
STEP 1: PROGRAMING
MODIFIERS
1. Access the Menu Modifiers Utility from the
Options Screen.
2. Press "new" along the
bottom row of buttons.
3. Under Menu Modifier
Desc, add the name of the modifier.
4. Under
Modifier, add the name of the mod.
5. Under
Price Increase, add a zero, or the price of
increase.
6. Press "add modifier" on the
righ-side of the screen.
7. Repeat steps 4 to
7 until complete.
8. Press "save" along the
bottom row of buttons.
STEP 2:
Connecting Modifiers to Menu Items
1. Access the Menu Modifier Utility from the
Options Screen.
2. Press "connect mod" from
the bottom row of buttons.
3. Select the Menu
Group or item to be linked to a modifier.
4.
Now select the modifier on the bottom right-side
of the screen.
5. If the item requires more
than one mod, add a checkmark to "multi-select."
6. Press "ok".
Linking Modifiers to
Modifiers (Advanced
Menu Modifier Utility Feautre)
Linking Modifiers to Modifiers
The ability to link
modifiers to other modifiers will be useful when
you require operators to be presented with only
the modifiers they need. This feature will
require all modifier groups to be created in the
Menu Modifier Utility. Follow the guide outlined
below to get started.
1. Access the Menu
Modifier utility.
2. Create or make sure all
required Mod Groups with Mods are created.
3.
Find and highlight the modifier to be linked.
4. To the right of the modifier, press the GROUP
field.
5. Select the Mod Group from the list.
6. Repeat steps 3 - 5 until all desired linked
mods have been linked.
7. Save and test your
changes.
Return to Top
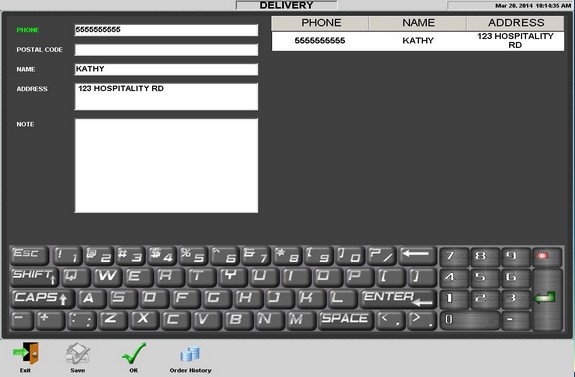
Placing an Order for Delivery
1. Press the Delivery button from the Table or Sales Screen.
2. Enter in a phone number.
Please note, that if there are no clients in the database, then you will have to enter in all the applicable information into the delivery utility then press 'Save'.
Furthermore, if there are clients in the database when entering in a phone number, then matching clients will begin to automatically appear. When the correct client has been found, press the OK button to be taken to the Sales Screen.
4. Select the correct client and press OK.
5. Enter the order from the Sales Screen.
6. When finished, press the Send and Exit button to pay later. Or Press the Payment type used to close the transaction. (Example. Visa, MasterCard..)
Please note, to retrieve an order, use the Tabs Button from the Sales or Table Screen.
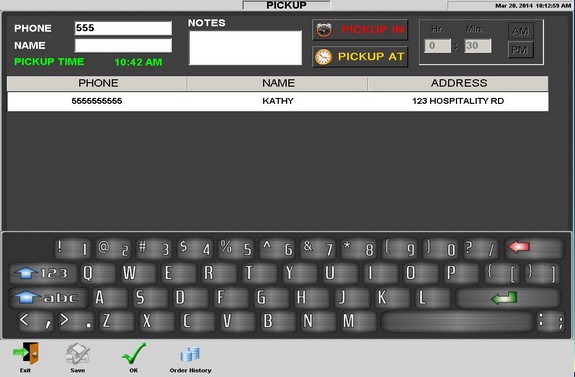
Placing an Order for Pickup
1. Press the Pickup Button from the Table or Sales Screen.
2. Enter in a phone number.
Please note, that if there are no clients in the database, then you will have to enter in all the applicable information into the delivery utility then press 'Save'.
Furthermore, if there are clients in the database when entering in a phone number, then matching clients will begin to automatically appear. When the correct client has been found, press the OK button to be taken to the Sales Screen.
4. Select the correct client and press OK.
5. Enter the order from the Sales Screen.
6. Select a 'Pickup Time' or 'Pickup at Time', if applicable.
7. When finished, press the Send and Exit button to pay later. Or Press the Payment type used to close the transaction. (Example. Visa, MasterCard..)
Please note, to retrieve an order, use the Tabs Button from the Sales or Table Screen.
Return to Top
Menu Sizes
Inventory Utilities
Keep in mind that the Inventory utility will
require regualar maintenance in order to help
realize its full potential. If one requires a
simplier method for tracking stock levels, than
feel free to use the WinRest™ Stock utility
found in the Options Screen.
For more information
on configuring button layouts, please review the
Button Library
section of the user
manual.
Menu Sheet Utility
Menu Stock
Price Schedule
Recipe Utility
Need more help?
To Add/Create Menu Sizes Using Menu
Item Details Utility
1. Access the Menu Item Details utility from
within WinRest™.
2. Press the 'Add Size' button.
3. If the
required size is not available, press 'Create
Size'.
4. The Menu Size utility will appear,
then create all sizes, press 'Save' and 'Exit'.
5. When back in the Menu Item Details utility,
select the size and add the appropriate
pricing in the Price 1 field.
To
Add/Create Menu Sizes Using Menu Size Utility
1. Access the Options Screen from within
WinRest™.
2. Access the Menu Sizes utility.
3. Use the Search button to see all existing
sizes.
4. Press 'New' from the bottom row of
buttons.
5. Give your new size and name, and
all applicable settings and press 'save.'
Return to Top
Please note, some States and Provinces have
their own regulations on what items may be
discounted. Please ensure every menu item is
checked with the Menu Item Details utility.
Fixed Discount
Buttons
The Fixed Discount buttons are available for
setting custom values for set discounts. Access
the default values tab under the Global Settings
Utility to edit the fixed discount values. Once
set, one can also rename the button to something
more appropriate, such as '10% Discount', and so
on.
Applying Fixed Discounts from
the Sales Screen:
1. Access the Global Settings Utility
from the Options Screen.
2. Under the default
values tab, adjust fixed discounts 1-5 and press
'save'.
3. Access the Button Library Utility
from the Options Screen.
4. Add the fixed
discount buttons to each applicable employee
type.
5. Rename the fixed discount for easy
reference. Example, 50% Discount.
6. Save
your changes and restart the application.
7.
When signed back in to WinRest™, and select and
item for discount.
8. Press the fixed
discount button you just added.
The Dollar Discount Button
The
Dollar Discount button has the ability to apply
a dollar discount to a particular item. To apply
a dollar discount, the item will have to be
selected/highlighted on the the notepad from the
Sales Screen, then use the onscreen keyad to
select a dollar amount, then press the Dollar
Discount button. To remove the dollar discount,
select/highlight the menu item, then use the
onscreen keypad and press '0', and press the
dollar discount button.
The Item Discount Button
The Item Discount button
has the ability to apply a discount to a
particular item. To apply an Item Discount, the
item will have to be sent, then highlighted on
the notepad. Then use the onscreen keypad to
select a discount rate, then press the Item
Discount button. To remove the applied
item discount, select/highlight the item on the
notepad, then use the onscreen keypad and press
'0' then press the Item Discount button.
The Total Discount Button
The Total Discount
button provides the ability to apply a set
discount to every item on the notepade. To apply
a total discount, use the onscreen keypad to
select a discount rate, then press the Total
Discount button. To remove an applied total
discount, use the onscreen keypad to select '0'
then press the total discount button.
Some discount buttons may have to be added to
the Sales Screen in order to be avaible to
staff. Access the Button Library to do just that
for each applicable employee type. To learn how
to add / edit buttons, feel free to review the
Button
Library section of the User Manual.
Return to Top
Managing inventory is easy with WinRest™
Professional as it helps control all aspects of
inventory. Create, edit and view inventory
easily. Furthermore, you can e-mail and create purchase orders,
recieve orders and analyze inventory levels with
informative reporting tools.
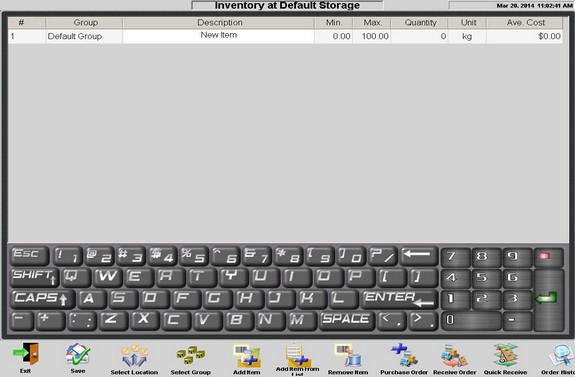
Getting Started with the WinRest™ Inventory
Utility
1.
Access the Inventory Utility from the Options
Screen.
2. Press the ADD ITEM button along
the bottom row of buttons.
3. Give the group
a name, a description, min max, quantity, unit
and cost.
4. Continue adding all required
menu groups and items until finished and press
SAVE.
5. Return to the Options Screen, and
then access the Menu Item Details Utility.
6.
In the Menu Item Details utility press the
RECIPE button.
7. Find
the matching item that was created in the
Inventory Utility on the lower half of the
screen, select it so it is highlighted, and then
press the ADD button.
8. Save your changes. Repeat stepts 5 to 8 until
all items have been created in the
Inventory
Utility and then attached with the Recipe
button.
Creating a Purchase Order
in WinRest™
1. Access the Inventory
Utility from the Options Screen.
2. Press the
PURCHASE ORDER button along the bottom row of
buttons.
3. Fill in all the appropriate
feilds such as supplier information.
4. Press the RAW MATERIAL button from the bottom
row of buttons.
5. Select the items to be
added to the purcase order and press SAVE.
Return to Top
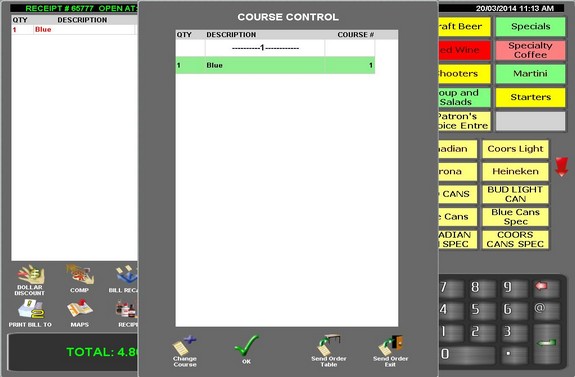
When creating menu groups and items, you can
pre-configure what course number each menu item
will hold. For example, appetizers will be
course one, and perhaps salad as the second, and
so on. That way, the kitchen printout will
indicate what item is under what course,
ensuring the kitchen staff prepare the meal
accordingly.
Furthermore, the Course
Control button, when added to the Sales Screen,
will allow you to assign any number of items to
a particular course number. The Course Control
button will have to be added to the Sales Screen
for each employee type that will be using it
and enabled from the Global Settings, Add-on Tab.
Configuring Course Numbers
1.
Enable Course Control from within the Global
Settings Utility.
2. Return the Options
Screen, then go to the Menu Group Utility.
3.
Find the Menu Group with the menu items to
configure.
4. Press the Menu Sheet Utility in
the bottom right corner.
5. Find the first
item to configure.
6. Adjust the course
number from 0 to 1.
7. Repeat this for all
menu items that will be course 1.
8. Save any
changes.
9. Find all course 2 items and
change from 0 to 2.
10. Repeat this process
until all the courses have been configured.
11. Remember to save any changes.
Changing Course Numbers from the Sales
Screen
1. Enable Course Control from
within the Global Settlings Utility.
2.
Return to the Options Screen and access the
Button Library.
3. Add the Course Control
button to Sales Screen for applicable Employee
Types.
4. Save any changes and restart the
application from the Options Screen.
5. Sign
in and access the Sales Screen.
6. Select
your menu items, then press the Course Control
button.
7. The Course Control utility will
appear, allowing you to change course numbers.
8. Select the first item, then press the Change
Course button.
9. Select the second item and
repeat step 8.
10. Then send the order with
either OK, Send order Table or Send Order Exit.
***Tip*** Send Order Table will return the
user to the Table Screen. Send Order Exit will
send the user to the WinRest™ Home Screen.
Return to Top
Parent Groups will help keep your menu items
and groups organized when there is a large and
complex menu. When a
Menu Group is placed under a Parent Group, there
will be a breadcrumbs bar with your location in
the Menu.
To exit a Menu Group that is
nested in a Parent Group, press on the First
Menu Group on the Breadcrumbs trail, or on the
Back Arrow button.
Return to Top
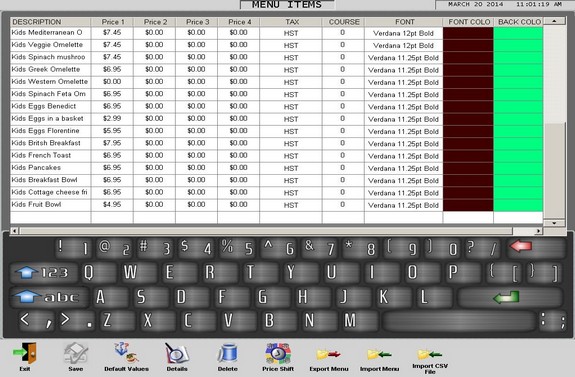
Creating
menu items can be done quickly and efficiently
with the Menu Sheet utility. Start by creating a
Menu Group with the Menu Group utility found in
the Options Screen. Once the menu group has been
saved, press the Menu Sheet button along the
bottom row of buttons.
The Menu Sheet
requires you to place a description, price in
the price 1 field, and an applicable tax to
function properly. Feel free to customize the
appearance by changing the font type, size and
colours.
Please note, when entering a
dollar value, please press ENTER on your
keyboard to have the Save button appear.
Furthermore, make sure to save your changes
every so often.
HELPFUL TIP: To apply
changes to every item on the sheet, press on the
title field, such as tax, and a prompt will
appear asking if you want to apply the setting
to the entire group, press Yes, then make your
selection/changes. Then press Save to save any
changes.
Return to Top
The Menu Stock
utility will allow you to monitor and adjust
stock levels for menu items. This is a great
tool to help track stock levels and can be found
in the Menu Utilities section of the Options
Screen.
Configuring the WinRest™
Menu Stock Utility
1. Create all the
Menu Groups and Items, save any changes and
restart the application.
2. Access the Menu
Stock Utility from within the Options Screen.
3. Start with the first Menu Group.
4. Enter
in the amount of stock in the ACTUAL field for
every menu item
5. Enter in the cost amount
in the COST field for every menu item.
6.
Save any changes and repeat this process for
every menu group and menu item.
Checking Stock in WinRest™
using the Report Utility
1. Sign
into WinRest™
as a supervisor.
2. Access the Report
utility.
3. Select 'Item Stock Report' from
the 'MISC. Reports' tab.
Return to Top
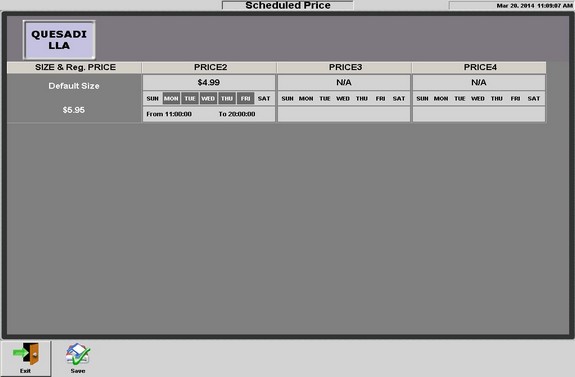
The price schedule serves two purposes. The
first is to give you and overhead view of the
current price schedule. The second is to provide
a tool to configure automatic price changes for
any given day and time. To use the Price
Scheduler, ensure that Price Shift is enabled
from the Add-Ons tab available in the Global
Settings utility.
Creating a Price Schedule
1. Access
the Add-Ons Tab found in Global Settings.
2.
Enable Price Shift and then press 'Save'.
3. Access
the Price Scheduler from the Options Screen.
4. Press the ADD button and select the first
menu item.
5. Press on the date section on Price 2.
6.
Choose the days of the week that are applicable.
7. Enter in a new value in the Price 2 field.
8. Repeat this process for every applicable
item.
9. Save any changes.
Please note, some
States and Provinces have their own regulations
on what items may be discounted. Please ensure
every menu item is checked with the Menu Item
Details utility.
Return to Top
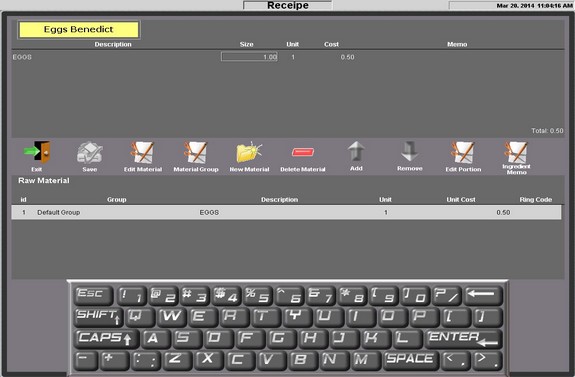
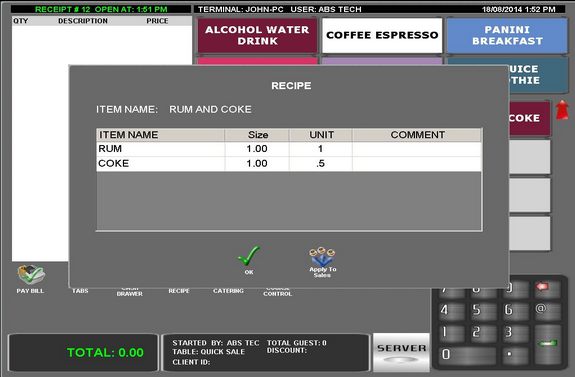
The Recipe
utility will be used when raw material is needed
to be tracked for reporting purposes and having
items joined together. This is especially handy
with items such as cocktails and mixed drinks.
For example, the beverage rum and cola will
require one part rum and one part cola. Use the
Recipe utility to add required items and their
cost.
Getting Started with
Recipes in WinRest
1. Create all
required Menu Groups and Menu Items.
2.
Access the Recipe button for the first item in
the Menu Details Utility.
3. Press New
Material. Enter in a Group Name, Description,
Unit, and Unit Cost
4. Save any changes.
5.
Now add the raw material below to the menu item
using the Add button.
6. Save your changes.
7. Repeat this process until all items and
recipes have been configured.
1. Access the Button
Library Utility from the Options Screen.
2.
Find the Recipe Button and add it to the
applicable Employeed Type Sales Screen.
3.
Save any changes and restart the application.
4. Sign in and access the Sales Screen.
5.
Press the Recipe Button and then the Item that
has been configured.
Example. Rum and Cola.
6. The Recipe
utlity will appear. Press OK to exit and Apply
to Sales.
For more information
on adding or removing buttons, please review the
Button Library section of the user manual.
Return to Top
The remote printing is a tool that allows you to
define printer locations and attach
menu groups, menu items and menu modifiers to
different printer locations.
To
Enable Remote Printing
1. Access the
"remote printing utility" from the Options
Screen.
2. Press "new location" from the
bottom row of buttons.
3. Give the new
location an appropriate name.
4. Press
"target device" and select the printer.
5.
Press "fail over printer" and select the
printer. (optional)
6. Select the Menu Group
or Menu Item so it is highlighted.
7. Press
"add". The printer location will move from the
left-side to the right. (From
location to
destination.)
*IMPORTANT*
Any printers, local or remote, that will print
orders must have the CUSTOMER ORDERS document
enabled from within the System Settings utility.
[Options Screen > System Settings > Printer
Properties (Select the printer, then press Edit
Device)].
Return to Top
Help from your Authorized WinRest™ Reseller
If you require more help with installing,
upgrading, or activating your copy of WinRest™,
please contact your WinRest™ Authorized reseller
today.
Help from a WinRest™
Expert Advisor
If you do not have an
Authorized Reseller, contact us today to find
out how to get started.
System Requirements
Supported operating systems
Windows POS Ready
2009
Windows XP SP2
and above
Windows 7 SP1 (x86
and x64)
Windows 8.1 (x86
and x64)
Windows 10 (x86
and x64)
Supported architectures
32-bit (x86)
64-bit (x64)
Hardware requirements
1 GHz or faster processor
1 GB of RAM (1.5 Ghz if running on a virtual machine)
1 GB of available hard disk space
600 MB of available hard disk space (language pack)
5400 RPM hard drive
DirectX 9-capable video card running at 1024 x 768 or higher display resolution.
Magnetic Card Reader
(Optional)
Barcode Scanner
(Optional)
Scale
(Optional)
Pin
Pad for accepting payments with WinAuthorize™
(Optional)
Software requirements
Microsoft .NET Frameworks
3.5
Firebird SQL 2.5

Return to Top