WinRest™ Online User Manual
Find Answers to all your questions about service options, pricing and other processes. Or visit the ABS YouTube channel for all the latest updates, videos and much more. And you can always chat live with an ABS Expert Advisor or call 905-278-7975 or 209-233-8846 today.
Top Solutions
| Add, Remove, Edit Employees | Forgotten Passwords |
| Button Library | Password Protection |
| Employee Types | Permissions Utility |
Browse by Category
Add, Remove, Edit Employees
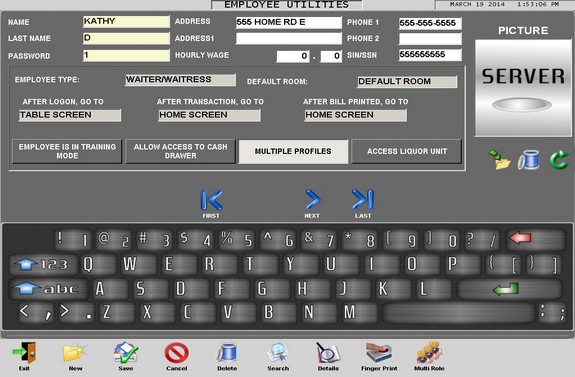
The Employee Utilities tool is a very important aspect of WinRest™. It is here where you will program employees into the system including owners, managers, supervisors, servers, bartenders, kitchen staff and assign individual settings and responsibilities.
To Add Employees
1. Access the Employee Utility from the Options Screen.
2. Press "new" along the bottom row of buttons.
3. Fill in the employee details.
4. Press "save" along the bottom row of buttons.
5. Restart the application and have the new user sign-in.
To Remove an Employee
1. Have the employee to be removed, sign-out.
2. Access the Employee Utilities from the Options Screen.
3. Press the "search" button and select the employee.
4. Press the "delete" button along the bottom row of buttons.
5. Once complete, restart the application.
Please note, that any changes to an employee must be done before or after their shift, and not during. Changing employee details during their shift is not recommended.
Furthermore, to hide employee passwords, enable Activate Mask On Employee Password under the terminal properties found in the System Settings utility.
Return to Top
Button Library
The Button Library is the second level of security in WinRest™ and will allow you to define exactly which buttons each user will have access to. In this section we will explore how to configure the button library for each user and each screen.
Employee Types and Button Layout
With the Button Library utility, employee button layouts can be configured and optimized for maximum efficiency and security. By default, WinRest has granted access to higher-level buttons such as void, and restaurant z to the Supervisor Profiles only. WinRest™ provides four employee types to start; Supervisor, Waiter/Waitress, Bartenders and Kitchen Staff.
Adding / Editing Buttons using the Button Library Utility
1. Open the Button Library Utility from the Options Screen
2. Select the screen that you would like to edit.
3. Select the employee profile that you would like to edit.
4. Choose the button to add/remote from the left side of the screen.
5. Press the "add" or "remove" button.
6. Press "save" and then restart the application.
HELPFUL TIP: There are several button categories to choose from; General, Sales, Tables and WinAuthorize*. *WinAuthorize buttons are only available to those who have an activated version WinRest™ and WinAuthorize™.
To Rename a Button
1. Open the Button Library Utility from the Options Screen.
2. Select the screen that to edit.
3. Select the employee profile that to edit.
4. Highlight the button to rename on left side of buttons.
5. Press "Edit Button" and rename.
6. Save your changes and restart the application.
Important Button information
Some buttons are designed to be utilized from either the Sales Screen, the Table Screen or both. If you notice that a button you added is not working, it may not designed for that particular screen.
Return to Top
Configure Employee X, Z
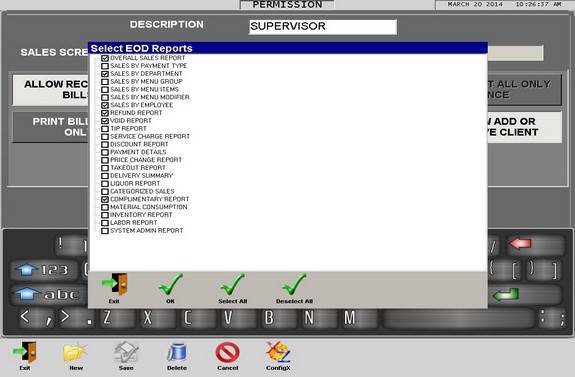
Quickly and easily configure the End of Day Reports (EOD Report) from the ConfigX utility found in the Permission's tool. Go through each employee type and then select the appropriate reports to be included on the EOD Report.
Furthermore, you may also configure the reports in the EOD tab of the Global Settings utility found in the System Settings tool.
Return to Top
Employee Details Utility
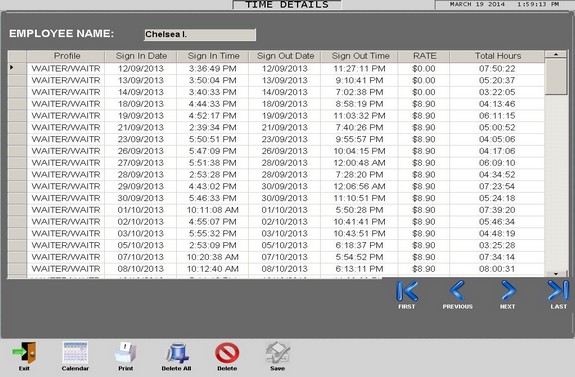
Use the Employee Details utility to calculate employee hours and even wages. When using the Employee Details utility for the first time, please note that the employees will have to sign in to the system using their password or fingerprint. Furthermore, a Restaurant Z must be done at least once, before any information is calculated and available in the Employee Details utility.
To Find an Employees Hours
1. Access the Employee Utilities from the Options Screen.
2. Find the employee then press the Details button.
3. Press the Calendar button then select the start and end date then press OK.
or
1. Sign in with a profile that has access to the Report Utility.
2. Use the Employee Labour or Labour Detail Report under Activity Reports Tab.
3. Use the Filter button to select an employee with a date and time range.
Return to Top
Employee Types
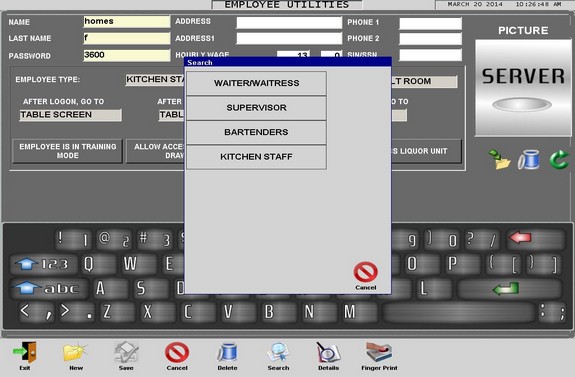
By default, WinRest™ provides four employee types to get started with; Waiter/waitress, supervisor, bartender and kitchen staff. Each type has their own unique button layout with reason. The supervisor will have access to more utilities than the kitchen and wait-staff.
Please make sure you review each employee type profile such as what they have access to, what screen they will be taken to during operation and so on.
Creating New Employee Types
1. Access the Button Library from within the Options Screen
2. Press the 'New' button on the bottom row.
3. Enter a name to represent a new profile, such as Owner, Host, etc.
4. Add all desired buttons to the right-side of the screen for Sales and Table screens.
5. Organize the order of buttons until happy and then press 'Save'.
6. Repeat steps 2-5 to add more button profiles for other employee types.
7. Return to the Options Screen and access the Permissions Utility.
8. Press the 'New' button to create a new employee profile.
9. Give the new profile a name to match the button profiles that were created.
10. Press the box next to the Sales Screen, select the corresponding button profile.
11. Press the box next to Table Screen, select the corresponding button profile.
12. Repeat this process for all new employee types.
13. Configure each profiles X report by accessing the ConfigX button.
14. Save your changes.
15. Lastly, assign the new profiles to employees in the Employee Utilities.
Return to Top
Employee Utilities
The Employee Utilities tool is a very important tool in WinRest™. It is here where you will program all staff into the system including owners, managers, supervisors, servers, bartenders and even kitchen staff. You can manage labour and customize their access and responsibilities on the system.
To Add Employees
1. Access the Employee Utility from the Options Screen.
2. Press "new" along the bottom row of buttons.
3. Fill in the employee details.
4. Press "save" along the bottom row of buttons.
To Remove an Employee
1. Have the employee you would like removed, to sign-out.
2. Access the Employee Utility from the Options Screen.
3. Press the "search" button and select the employee.
4. Press the "delete" button along the bottom row of buttons.
5. Restart the application.
Please note, employees will have to close or transfer any attached transactions and sign out before they can be deleted from the system.
Return to Top
Employee Status
Utilities
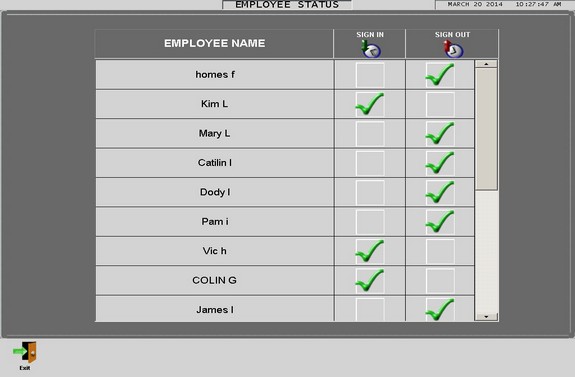
When using the Employee Status Utility,
those with an
administrative privileges can easily sign an
employee in or out without knowing their
password, having their swipe card
present or
scanning their fingerprint.
The Employee Status utility
is located in the Options Screen. If an
employee is signed in and
you wish to sign them out, simply find
their name on the list and
select the sign out
box.
WinRest™
will ask for confirmation.
Furthermore,
employee status can also be determined
from the Home Screen
by using the Employee Status button.
Return to Top
Finger-print
Protection
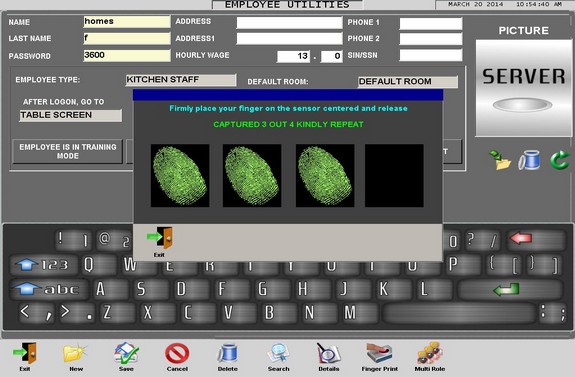
If you
system is equipped and installed with biometric
fingerprint readers you must register each
employees fingerprint. Simply press the Finger
Print button and give four samples of the finger
the employee will use to access the system.
.
*** IMPORTATNT
REMINDER **** Make sure your license has been
activated for finger-print readers, the Terminal
properties have Finger Print Protection enabled,
and Windows® has the latest Digital Persona®
drivers with SDK.
Return to Top
Multiple Employee
Profiles
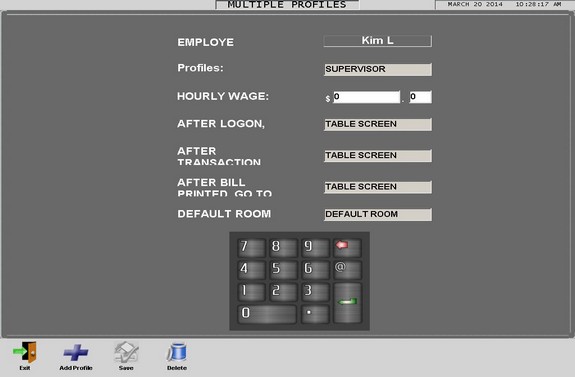
It is possible for an employee to have multiple
roles in the system. This is typically used if
they work as a bartender one
shift and then a
server another shift. WinRest™
can help with the ability to
create multiple profiles for
any employee.
Creating / Enabling Multiple Profiles
1. Access the Employee Utilities from the
Options Screen.
2. Select or create the
appropriate employee.
3. Enable 'Multiple
Profiles' and press 'Save'.
4. Access the
'Multi Role' button on the bottow row of
buttons.
5. Customize each role with any
applicable settings.
6. Save any changes and
restart the application.
To delete any
multi role profiles, access the specific
employee using the Employee Utilities, press the
'Multi Role' button and then press the 'delete'
button on the bottom row of buttons.
Return to Top
Password Protection
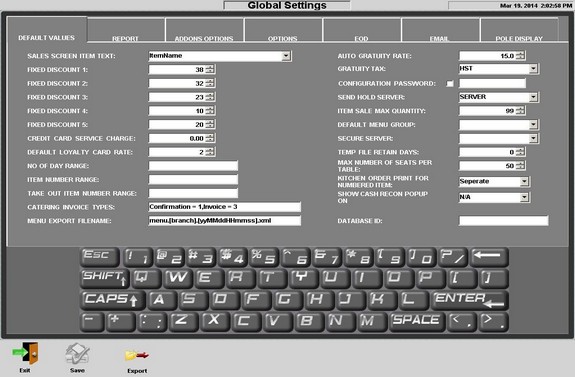
Password
protection is essential to maintain system
security. The first layer of protection is
the employee password. To add / edit or
configure an employee password, please review
the Employee Utilities section on the user
manual. To further enhance system
security, add a configuration screen password
from the default values tab of the Global
Settings Utility.
Furthermore, to hide employee passwords, enable
Activate Mask On Employee Password under the
terminal properties found in the System Settings
utility.
If you have forgotten
your password, please contact your authorized WinRest™
Reseller.
Return to Top
Permissions Utility
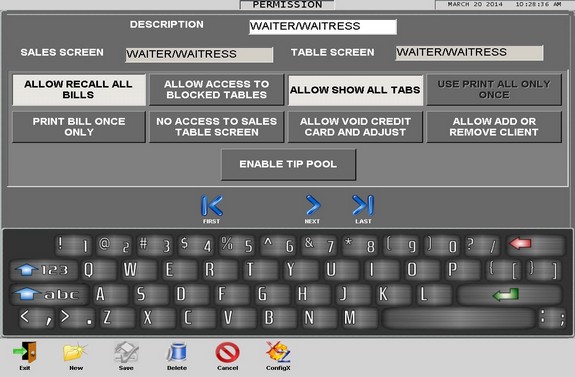
The
Permissions utility is used
for
controlling levels of
access
in WinRest™
and to configure the reports that appear for
each profile type. You can define as many
levels as you require and can customize
permissions and
buttons for each user.
Please makes sure to review every employee type
and its settings.
Return to Top
The Employee Schedule utility will help plan your employee schedule in advance. Feel free to utilize this feature by accessing the Options Screen.
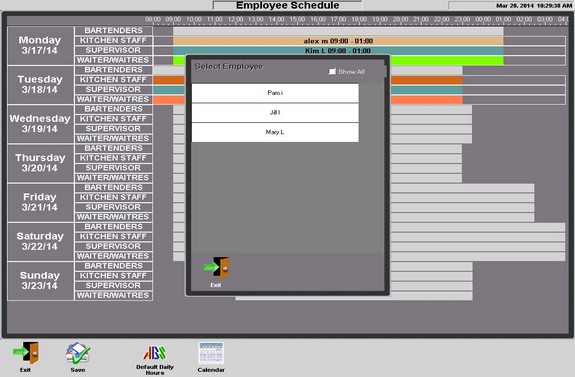
Creating an Employee Schedule
1. Access the Options Screen.
2. Press the Employee Scheduler button.
3. Press the field next to the employee type.
4. Select the available employee from the list that appears.
5. Repeat this process until the schedule is complete.
Return to Top
Training Mode
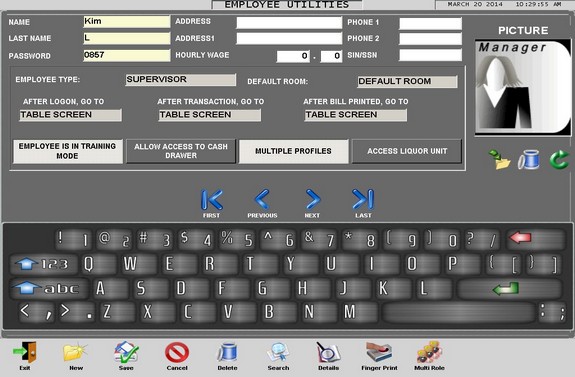
By
enabling Employee Training Mode, the current
employee will be considered a trainee. They can
access the system; however any sales they input
will not record into the daily totals. Any bills
they print will be clearly labeled with training
mode.
Several features will be
disabled when an employee is in training mode.
Disabled features include: Operator transfer,
Transfer all, Bill recall and gratuity.
Return to Top
Need more help?
Help from your Authorized WinRest™ Reseller
If you require more help with installing,
upgrading, or activating your copy of WinRest,
please contact your WinRest Authorized reseller
today.
Help from a WinRest™ Expert Advisor
If you do not have an
Authorized Reseller, contact us today to find
out how to get started.
System Requirements
Supported operating systems
Windows POS Ready
2009
Windows XP SP2
and above
Windows 7 SP1 (x86
and x64)
Windows 8.1 (x86
and x64)
Windows 10 (x86
and x64)
Supported architectures
32-bit (x86)
64-bit (x64)
Hardware requirements
1 GHz or faster processor
1 GB of RAM (1.5 Ghz if running on a virtual machine)
1 GB of available hard disk space
600 MB of available hard disk space (language pack)
5400 RPM hard drive
DirectX 9-capable video card running at 1024 x 768 or higher display resolution.
Magnetic Card Reader
(Optional)
Barcode Scanner
(Optional)
Scale
(Optional)
Pin
Pad for accepting payments with WinAuthorize™
(Optional)
Software requirements
Microsoft .NET Frameworks
3.5
Firebird SQL 2.5

Return to Top