WinRest™ Online User Manual
Find Answers to all your questions about service options, pricing and other processes. Or visit the ABS YouTube channel for all the latest updates, videos and much more. And you can always chat live with an ABS Expert Advisor or call 905-278-7975 or 209-233-8846 today.
Top Solutions
| Add / Edit / Remove a Device | Sales Screen |
| Backup Schedule | Sales Settings |
| License and Activation | Table Screen |
Browse by Category
License and Activation
Activating WinRest™
via
the Internet
1. Access the Options Screen.
2. Go to the
System Settings utility.
3. In the bottom
left corner, press the License Button.
4.
Enter in your license code and press 'update'.
1. Access and download your "License.lic"
file from
www.winrestsoftware.com
2. Go to the WinRest™
Program Files
directory.
3. Overwrite/replace the
"License.lic" in the WinRest™
Program Files folder.
4.
Start
WinRest™.
**IMPORTANT** The
Customer Receipt must then be updated to
match the license
information. Go to
the Receipt Settings to complete activation.
Adding
Additional Systems/Equipment
or Configuration Changes
System configurations are tied to the
WinRest™ license file, so in the event of
adding additional equipment like Tablets,
Terminals, AdScreen™, etc, additional
licenses will be required. Hence,
configuration changes after initial
activation may require WinRest™ to be
re-activated.
Feel free to contact
your Authorized WinRest™ Reseller or call
905-278-7975 to speak with an Expert Advisor
to learn more.
Add / Edit / Remove a
Device
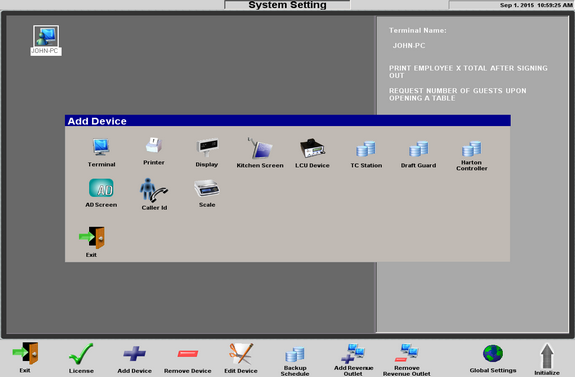
The System
Settings Tool allows you to add / edit or
configure your extra devices, such as your
printers, pole display, AdScreen™,
WinVue™ and much more.
To Add Devices to WinRest™
1. Access the System Settings Utility from the
Options Screen.
2. Select "add device" from
the button row of buttons.
3. Select the
device that you would like to add to your
system.
4. Restart the application.
**IMPORTANT** Some devices require
further customization.
To Remove Devices from WinRest™
1. Access the System
Settings utility from the Options Screen.
2.
Select the device to remove so it has become
highlighted.
3. Select the 'Remove Device"
button from the bottom row of buttons.
4.
Restart the application.
IMPORTANT: Please
keep in mind that backing up the database before
removing devices to a new database may not be
critical. However, backing up a database before
editing an existing database that has been
extensively configured, is strongly recommended.
To learn more about backing up a
database in WinRest, review the
Database Backup Scheduler
section of the User Manual.
Return to Top
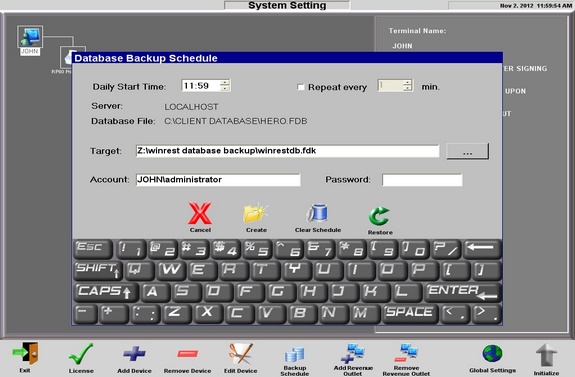
Backing up your
WinRest™ database is one of the most important
things you can do to preserve your data. WinRest™
incorporates a configuration tool which works
with Windows task scheduler to automatically
make daily database backups. It is highly
recommended to use an external USB memory stick
to store any backups.
To Create a Database Backup
1. Access the System Settings Utility from the
Options Screen.
2. Select "backup schedule"
from the bottom row of buttons.
3. Select the
start time.
4. Select the "target" or
location of where the backup will go.
5. Add
the Windows Administrator password.
6. Press "create".
IMPORTANT: Ensure there is a
password for the Windows® administrator User
Account, as it is required when completing the
Database Backup. For systems using Windows 7®
and above, the account name will have to be the
name of the Windows® administrator account.
Otherwise, on systems with Windows XP®, leave
the account name as 'administrator'.
Furthermore, feel free to make multiple backups
throughout the day/week and to more than one
storage medium.
To Restore From a Backup
1. Access the
"system settings utility" from the Options
Screen.
2. Select "backup schedule" from the
bottom row of buttons.
3. Press "restore".
4. Find the backup file and press "ok".
5.
The restore process will begin.
TIP: For windows 7®
and above, try using the FDB Backup
Manager that is available from the WinRest™
Program Files directory with compatibility
settings for Windows XP
SP3® and to 'run as administrator'.
For instances when the restore does not start,
try restoring the database on a Windows XP®
based system.
Return to Top
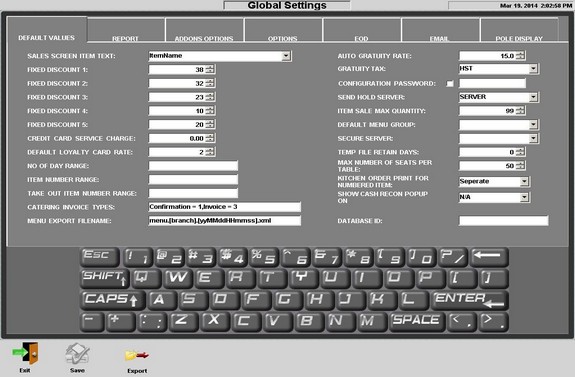
The Global Settings Utility is used for applying
system wide changes. In other words, adjusting
the settings in the Global Settings will apply
the settings to every machine. There are several
tabs to quickly find and apply desired settings.
Global Settings Default Values Tab
The first tab found in the Global Settings
Utility is the default values tab. There,
settings like fixed discounts, default menu
groups, cash reconcile settings and much more
can be configured.
Global Settings
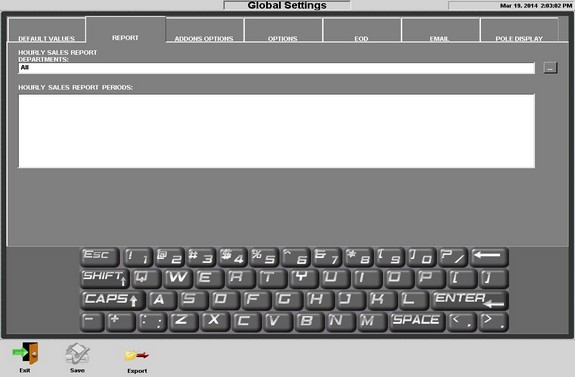
Report Tab
The next tab found the in the Global Settings
utility is the Report tab. This section is meant
for applying certain XML scripts to generate the
hourly sales report. If no data appears when
trying to generate an hourly sales report, the
script will have to be added into the Hourly
Sales Reports Periods section. This particular
script should be available in the WinRest™
Installer package. If not, contact your
authorized WinRest™
Reseller.
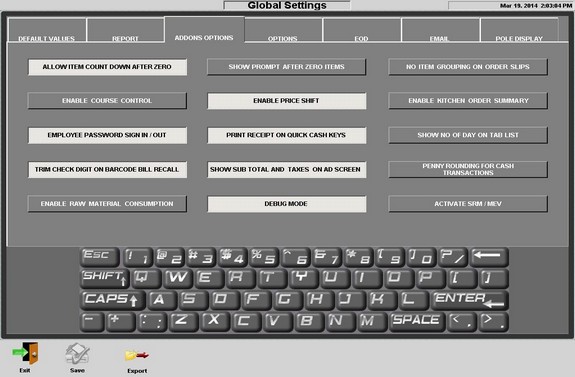
The Global Settings
Addons Tab
The Add-ons Options tab is where many great
features of WinRest™ can be enabled. Most, if
not all
features here are applicable to any hospitality
environment and are beneficial to operations.
Try the add-ons that are applicable to your
specific requirements. Please note, the 'Activate
SRM/MEV' is only required in the Province
of Quebec, Canada, at this time.
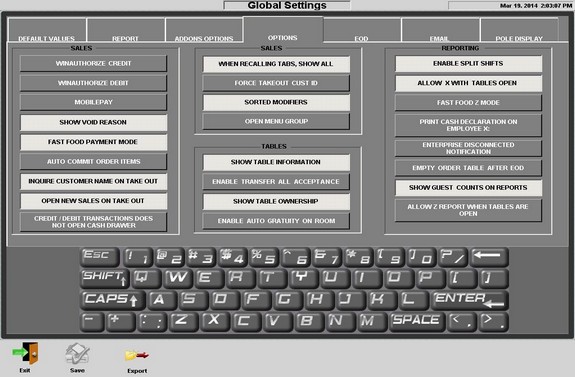
The Global Settings Options Tab
The Options Tab is
categorized in Sales, Tables and Reporting
options. Feel free to try the features found in
this part of Global Settings to see if they are
applicable to your specific requirements.
The
Global Settings EOD Tab
The section
of Global Settings is where End of Day process, such as enabling Auto Z,
custom End of Day (Z Report) Reports and more
can be enabled.
For those businesses that require WinRest
Enterprise™ access,
configuration settings are available in this
section of Global Settings.
The Global Settings E-mail Tab
Those with outbound SMTP services can
take advantage of receiving End of Day Reports
delivered to an inbox virtually anywhere in the
world that has internet access. Configure EOD
E-mail access in this section of
Global Settings. To send the EOD to more than
one e-mail address, separate the e-mail
addresses with a semi-colon. For example,
john@email.com;kathy@email.com.
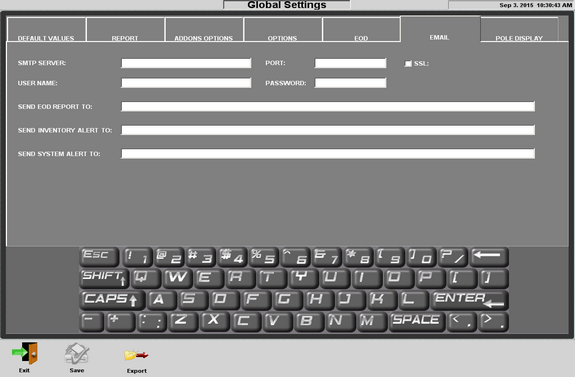
Please note, this particular feature of
WinRest™ requires users to have outgoing SMTP,
and will require users to follow the outgoing
SMTP settings set by the SMTP provider. Lastly,
EOD E-mails are subject to the SMTP server being
online.

The Global Settings Pole Display Tab
The
Pole Display tab is where welcome messages and
delay settings can be configured. For pole
displays to work in WinRest™,
please ensure that a pole display device with
correct communication port settings was added to
the System Settings utility.
Return to Top
Options Screen
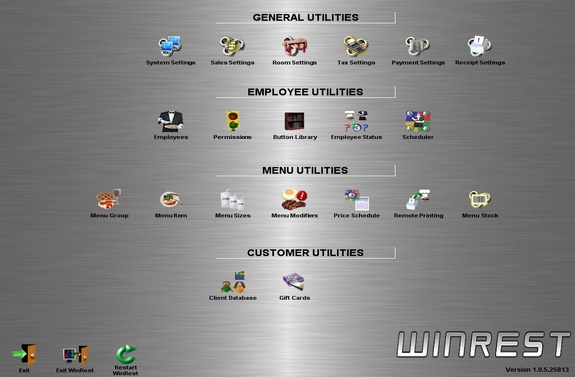
The Options Screen, or also known as the
configuration screen, is the starting point for
customizing every aspect of WinRest™ and its
add-on modules, such as WinAuthorize™, WinVue™,
AdScreen™, Mobile Pay™ and more. The Options
Screen is accessible by signing into WinRest™
with a Supervisor profile.
Helpful Tip:
Enhance the security of your system by adding a
password to the Options Screen. To do this,
visit the Default Values tab of the Global
Settings utility.
If you have forgotten
the Options Screen / Configuration Screen
password, contact your Authorized WinRest™
Reseller.
Return to Top
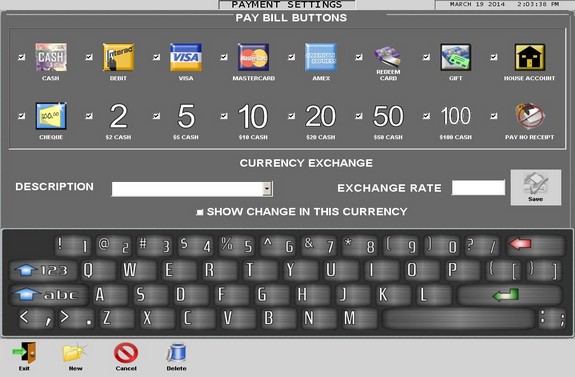
The Payment Settings
Utility found in the Options Screen allows you
to configure what payment buttons appear when
pressing the Pay Bill button from the Sales
Screen. Using the Pay Bill button from the Sales
Screen helps optimize payment processing and
allows room for other buttons.
Adding The Pay Bill Button to the Sales
Screen
1. Open the Button Library
Utility from the Options Screen.
2. Select
the Sales Screen.
3. Select the employee
profile.
4. Search for and select the 'Pay
Bill' Button.
5. Press the "add" button and
save your changes.
6. Repeat this process to every
desired employee profile.
7. Restart the
application for the buttons to appear.
To
learn more about adding / removing buttons,
review the
Button
Library section of the User Manual.
Accepting Another
Currency or Currencies
from within WinRest™
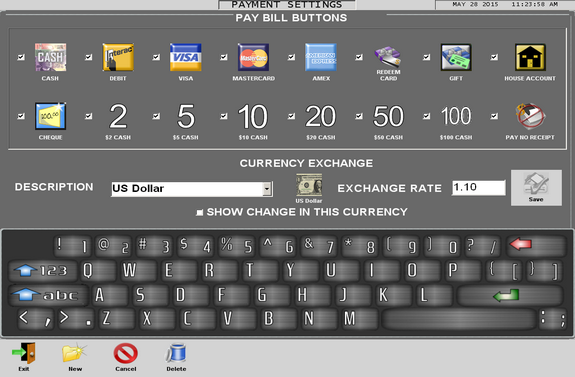
Under the Payment
Settings, Exchange Rate section, end-users
can enter in the
exchange rate in either two
ways; no-fee, or fee-exchange.
1.
No-Fee Exchange: Current approx. US CAD
exchange is 100 US Dollar = 124.76 CAD or 1 US
Dollar = 1.25 CAD. For
a flat exchange rate, the
value to put would be
1.25.
2. Fee Exchange: To
earn money for the currency conversion,
the number to enter will
have to be lower than the no-fee exchange
value. For example, 1.10. Meaning,
at 1.10 in the exchange rate section,
a $10 bill would be $9.09 US. A
value of 1 in the exchange rate section would mean that 1 US Dollar
would be equal to 1 CAD.

To Implement Currency Exchange
1. Access the Payment Settings Utility from the
Options Screen.
2. Select
a currency from the drop down menu.
3. Enter
in the desired value
in the exchange rate field.
4. Continue
adding the exchange rate for all accepted
currencies and save any changes.
5. Access
the Button Library utility from the Options
Screen.
6. Add the
Currencies to the Sales Screen for each
employee.
7. Save your changes and restart
WinRest™.
8. Access the Sales Screen,
select an item and press the new currency
button.
9. A prompt will appear allowing you
to enter the amount received, then press OK.
10. Select the amount of change with the
appropriate currency.
Return to Top
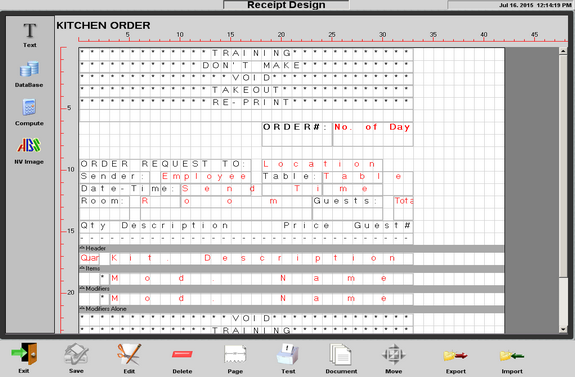
The Receipt Settings
screen will allow you to customize the look of
your customer receipts and kitchen orders. By
default, WinRest™ has configured the guest
receipt for a typical restaurant application.
Please be careful when making changes.
Customize the receipt to display social media
links, promotions and much much more. And when
you want to see how the receipt will appear,
press the TEST button.
**IMPORTANT** Altering your
receipt design should be done by authorized
WinRest™ Resellers. The Restaurant name is tied
to the WinRest™ License, so keep in mind that
changing the restaurant name will affect
activation. And make sure to make backups of the
database file in the event that you need to roll
back from any changes.
Customizing the Receipt / Kitchen Order
Documents
1.Drag the icon of the object field on to the
document.
2. Drag the text icon on to the
document for a title of the object.
3. The
Text options will appear. Add text and its
settings.
4. Press 'OK' to save, 'Cancel' to
discard any changes.
The Text
Field
The first field is a Text
field. A text field will allow you to create any
personalized message that you want to print on
every bill. This is typically used when you want
to advertise promotions to your customers or
include your tax registration number somewhere
on the bill.
The Data Field
Data fields are always presented in red. Placing
a data field on a receipt will cause the
software to retrieve specific information from
the database. You cannot control what
information a data field provides. An example of
a data field is the ITEM AMOUNT. This is taken
from the database as programmed in the Menu Item
Creation screen.
The Compute
Field
Use the Compute field to make
customized expressions or macros appear on the
bill such as cost breakdowns, suggested tip
amounts or customized item
discount information. Consult your authorized
reseller for more information and specific
formulas used with this tool.
The
NV Image Field
By using the software
that came with your receipt printer you are able
to store and print your company's logo on the
customer receipts. Use this tool to place and
position your logos, QR Codes, etc., on the
receipt design.
The Image Field
By using the software that came with your
receipt printer you are able to store and print
your company's logo on customer receipts. Use
this tool to place and position an image on
the receipt design.
Return to Top
Adding and Customizing the Order Number Using
Receipt Settings
Customizing the Order Number That
Appears on the Customer Receipt
1.
Access the Receipt Settings from the Options
Screen.
2. Drag the Database Field into the
header section.
3. When the database field
prompt appears, select No. of Day and press OK.
4. No. of Day will appear in red in the
header section.
5. Drag the Text field into
the header section and place it to the left of
the No. of Day.
6. When the Text Field prompt
appears, type Order #: and then press Ok.
7. Press Save to save your changes. Now, the
Kitchen Order doc will have to be updated.
8.
Press the Document button on the bottom row,
then
select Kitchen Order from the list.
9. Repeat
steps 2-6 to add the No. of Day to the header of
the kitchen order document.
10. Exit the
Receipt Settings utility and return to the
Options Screen.
11. Access the Global
Settings utility that is available from System
Settings.
12. Under the Default Values tab,
place 1,50 in the No. of Day Range field.
13.
Press Save to save your changes.
14. Access
the Options Tab, and enable Empty Order Table
After EOD and then press save.
15. Send a
test order to confirm that the order number is
appearing on the kitchen and customer printouts.
The No. of Day range can be any value that
you wish. The values will have to be separated
by a comma. Using this method to reset the
order number at the end of day
can benefit fast-paced environments by making it
manageable staff and patrons to call out and
retrieve their orders.
Return to Top
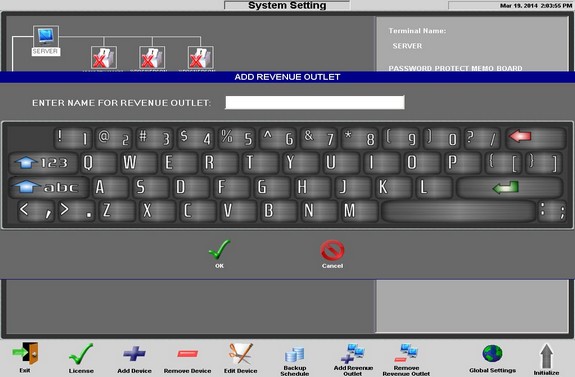
If your business has
more than one revenue outlet, or point of
purchase area, then feel free implement the
Revenue Outlet to enhance reporting
organization. For example, an establishment that
offers / sells merchandise in their restaurant /
entertainment complex can label the system as a
revenue outlet.
Doing so will
allow you to filter reports by revenue outlet to
track down sales figures quickly and almost
effortlessly.
Return to Top
Designing your rooms
in WinRest™ is quick and easy. Having your floor
design in WinRest™ will allow staff to access
their tables quickly, see how long their guests
have been there, and much much more.
Designing Your Floor Space
1. Access the "Room Settings" from the Option
Screen.
2. Press "new" from the bottom row of
buttons.
3. Give your new room an appropriate
name.
4. Add tables, bar-tops and more until
your are complete.
5. Press "save".
6.
Repeat this process for every room.
7.
Restart WinRest for
the changes to take effect.
Return to Top
The Sales Settings
Utility found in the Options Screen will allow
you to customize the look and feel of your Sales
Screen. From the number of columns and rows, to
the position of your menu groups and items, this
utility will help streamline sales and ensure
the fastest transaction times as possible.
Customizing the Sales Screen Layout
1. Access the Options Screen from within
WinRest™.
2. Go to the Sales Settings Utility.
3. Place a value for column and row for Section
Menu.
4. Place a value for column and row for
Item Menu.
5. When you are satisfied with the
layout, press the OK button.
6. Restart WinRest for the changes to take
effect.
The Position utility is used to arrange both
the menu groups and menu items on the Sales
Screen. Use this utility to organize the sales
screen groups and items to met your specific
requirements.
To Alphabetize the
Menu Groups and Menu Items
1. Access
the Options Screen from within WinRest™
2. Go
to the Sales Settings utility and press the
POSITION button.
3. Press the Alphabetical
Order button along the bottom row of buttons.
4. Repeat steps 3 for the Menu Items if
required.
5. Press the SAVE button and then
Restart WinRest.
To Reposition
Menu Groups and Menu Items
1. Access
the Options Screen from within WinRest™
2. Go
to the Sales Settings utility and press the
POSITION button.
3. Select the group or item
to move so it is selected.
4. Use the
directional pad to move the group and then press
the SAVE button.
5. Restart WinRest.
Return to Top
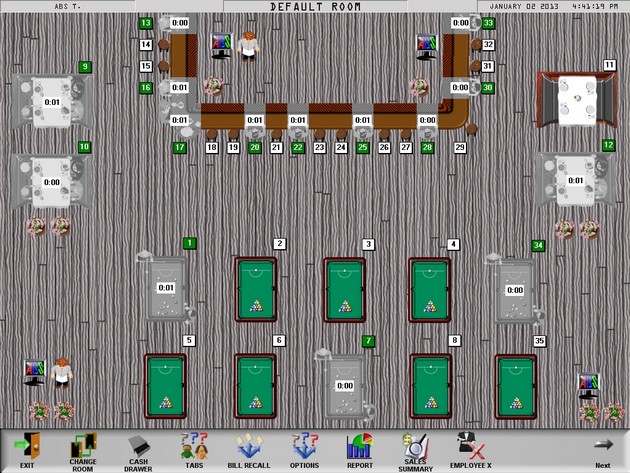
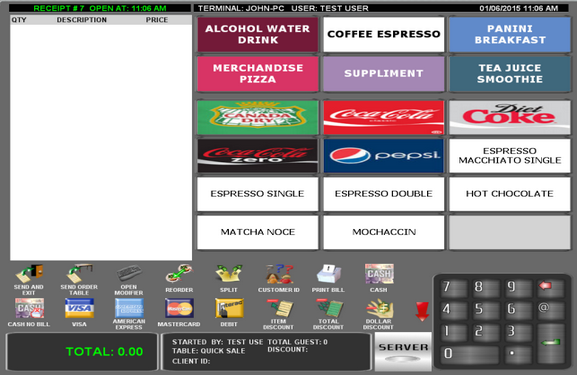
The
WinRest™ Table Screen is where users have
a visual overview and control of the sales environment.
The table screen environment is highly
customizable, using the Room Settings and Button
Library utilities.
Table
Ownership
The Table Ownership
feature can be implemented from the Global
Settings and allows more control over access to
tables and transactions. When enabled, tables
opened by other users will appear gray in
colour.
The WinRest™ floor plan is a very
visual and detailed tool that can be customized
to re-create the actual floor plan of your
restaurant. There is a variety of different
table , bar , floor and other miscellaneous
pieces which can be used to represent your floor
plan.
For more information visit the
ROOM SETTING TOOL & the
OPTION SCREEN
sections of the user manual.
Return to Top
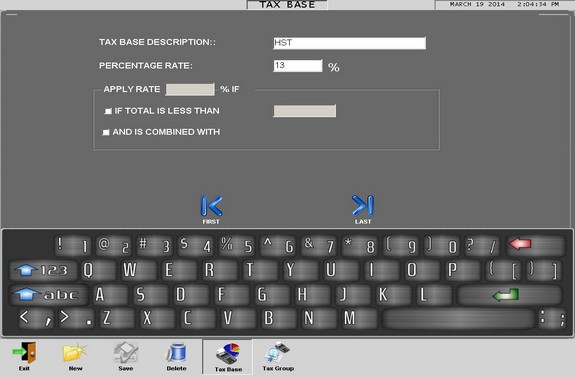
The Tax Settings tool
is designed to help you configure WinRest for
your regional tax structure. WinRest 1.95™ and
above, can handle tax for North America and its
tax settings have already been configured. If
you are not sure if your tax structure is set up
correctly, please contact your Authorized
WinRest™ Re-seller.
Access to the Tax
Settings can be located within the Options
Screen. The tax settings screen consists of two
major screens. The Base Screen and the Tax Group
Screen.
A Tax Base is another term for
the individual tax itself (i.e. HST, Michigan
State Tax, etc.) It is possible to configure
as many Tax Bases as you need. Later you can
combine these base taxes to form groups.
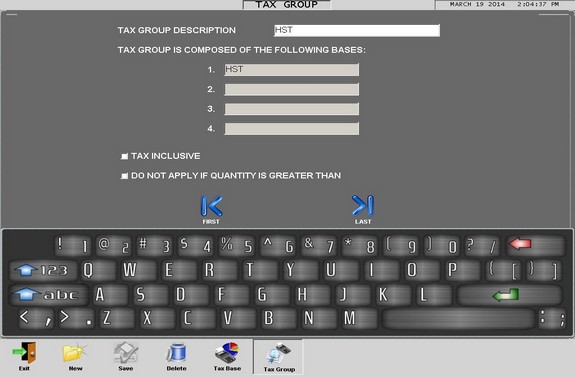
Tax Groups are
basically used to combine several tax bases
together. If you do not require two bases in a
group, you must still create a group for one
base. If you want to create a new tax group,
simply click New You must enter the description
of the base. For example: GST or HST. Secondly
you must input the percentage rate of the new
base. If any of the exemptions or exceptions
applies to your base then select them.
When you are finished, remember to save your
changes. The Tax Group is created by
combining tax bases together. In most
circumstances you will only require one base. It
all depends on the tax system in your region.
Creating a Tax Group
1. Access the Tax settings from the Options
Screen.
2. Press the New button on the bottom row of
buttons.
3. Give the new tax group a
description (Example. Donut Tax or Bakery Tax)
4. Then you must touch the grey box labeled 1
5. Select the tax base you wish to attach to the
new group.
6. Save your changes and restart
the application.
You can choose a total
of four combined groups. Once you create a
proper tax group, it will be available for
attachment in the Menu Item Creation tools.
Tip: If you
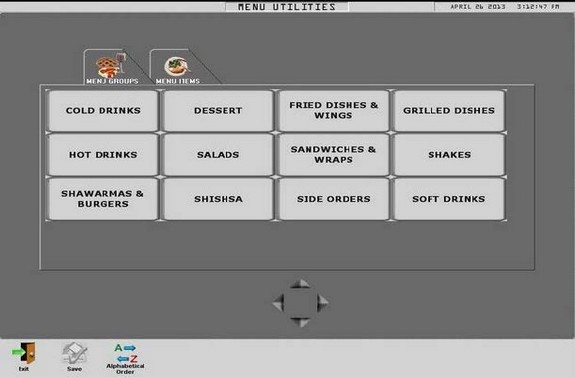
Using Images at the
Sales Screen for Menu Items
WinRest™
has the ability to display images for menu items
rather than text. To do so, follow the steps
outlined below. Please keep in mind that the
images will have to be .PNG file-types and named
accordingly.
1. Access the Global Settings Utility and on the
Default Values Tab, select LocalImage
from
the 'Sales Screen Item Text' drop-down menu, and
then press “SAVE”.
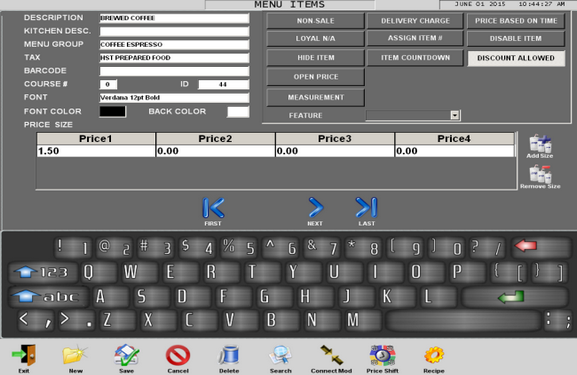
2. Access the Menu Item Details and take
note of the ID Number for each item that will be
displaying an image. Each Menu item will have a
unique ID number. This number is required for
naming and linking images to menu items.
3. Exit WinRest™ and Access the Program
Files directory. Ensure there is a folder called
"menu_images" there. If it is not there, create
it.
C:\Program
Files\ABS\WinRest 1.96\menu_images.
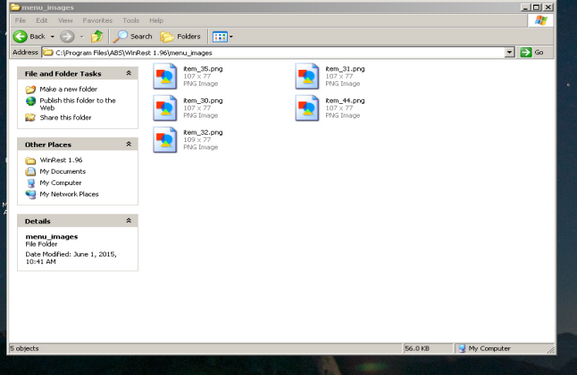
4. Place your .PNG images in the
'menu_images'folder of the WinRest Program Files
directory. Each image will have to be named
"item_x.png" where x=the menu item ID.
For example, item_31.png. 31 was the ID
number found in the Menu Items Detail utility ID
section.
5. Return to the Sales Screen, and the
images will appear under the Menu Items section.
Need more help?
Help from your Authorized WinRest™ Reseller
If you require more help with installing,
upgrading, or activating your copy of WinRest™,
please contact your WinRest™ Authorized reseller
today.
Help from a WinRest™ Expert
Advisor
If you do not have an
Authorized Reseller, contact us today to find
out how to get started.
System Requirements
Supported operating systems
Windows POS Ready
2009
Windows XP SP2
and above
Windows 7 SP1 (x86
and x64)
Windows 8.1 (x86
and x64)
Windows 10 (x86
and x64)
Supported architectures
32-bit (x86)
64-bit (x64)
Hardware requirements
1 GHz or faster processor
1 GB of RAM (1.5 Ghz if running on a virtual machine)
1 GB of available hard disk space
600 MB of available hard disk space (language pack)
5400 RPM hard drive
DirectX 9-capable video card running at 1024 x 768 or higher display resolution.
Magnetic Card Reader
(Optional)
Barcode Scanner
(Optional)
Scale
(Optional)
Pin
Pad for accepting payments with WinAuthorize™
(Optional)
Software requirements
Microsoft .NET Frameworks
3.5
Firebird SQL 2.5

Return to Top